Over the last year, I’ve gradually moved more and more towards making my own food at home. There are several reasons for this: it tastes better, it reduces preservative intake, it’s more nutritious, and it’s often substantially cheaper than what you find in the store. It does take time, but once you get used to it, most food preparation doesn’t take much more time than going to the store, buying it, taking it home, popping it out of the package, and following the directions.
Breadmaking is a prime example of this phenomenon. Homemade bread is substantially tastier than store-purchased bread, isn’t laden with preservatives, is very inexpensive to make, and doesn’t take all that much time, either.
The Problems With Industrial Bread
Most people in the United States today view the bread purchased at the supermarket as what bread should be. The actual truth is that the bread you buy in the supermarket has the texture and substance that it has for one reason and one reason alone: so that it can be made on an industrial scale and not grow “old” on the shelf at your supermarket.
There are two big explanations for this. The industrial scale process is designed to maximize profit while still producing an edible loaf of bread on the table. This is done by using an excessive amount of yeast in order to create lots of air bubbles in the bread, hence the “light” texture of store-purchased bread. It also allows for the use of lower-quality grains because of this yeast abundance, thus the bread is far from nutrient-rich. In the United States, most recipes are trade secrets, but in the United Kingdom, the standard recipe, known as the Chorleywood Bread Process, is widely known. The goal of this process is to make a loaf of bread as cheaply as possible, foregoing flavor, nutrition, and texture along the way.
The other bothersome part of industrial breadmaking is the appearance of a healthy dose of preservatives. These preservatives are there solely to extend the shelf life of the bread, again reducing costs for the manufacturer. Every time you eat a piece of store-purchased bread, you’re getting a healthy dose of preservatives with each bite.
Take a look at the ingredient list from a loaf of Home Pride butter top honey wheat bread, a fairly standard store-purchased loaf in my area. I bolded some of the ingredients.
Enriched wheat flour (flour, barley malt, ferrous sulfate (iron), “B” vitamins (niacin, thaimine mononitrate (B1), riboflavin (B2), folic acid)), water, sweetener (high fructose corn syrup or sugar), yeast, wheat bran, whole wheat flour, wheat gluten, molasses. Contains 2% or less of: soybean oil, salt, sweet dairy whey, butter (cream, salt, enzymes), maltodextrin, honey, corn syrup, calcium sulfate, soy flur, dough conditioners (may contain: dicalcium phosphate, calcium dioxide, sodium stearoyl lactylate, ethoxylated mono and diglycerides, mono and diglycerides, and/or datem), yeast nutrients (may contain: ammonium sulfate, ammonium chloride, calcium carbonate, monocalcium phosphate, and/or ammonium phosphate), cornstarch, wheat starch, vinegar, natural flavor, beta carotene (color), enzymes, calcium propionate (to retain freshness), soy lecithin.
That’s what a slice of store-purchased bread contains.
How to Make Your Own Tasty Homemade Bread, Easily and Cheaply
What I’ve found is that many people are simply intimidated by the seemingly complex and work-intensive process of making bread. It seems difficult and loaded with steps and significant work.
In fact, bread is quite easy to make at home, and you only need a few staple ingredients to make a simple loaf. Here’s exactly how to make a delicious loaf at home from scratch.
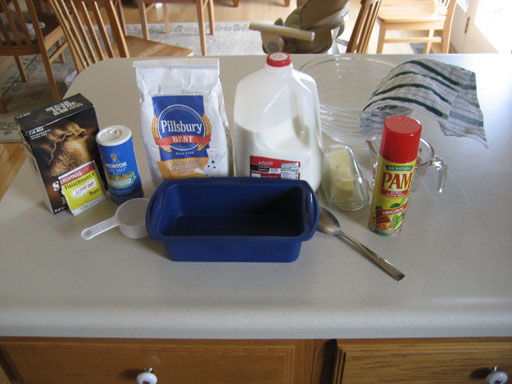
What you see on the table there is every ingredient and piece of equipment that you need to make a loaf of bread (except the oven). Nothing complicated at all, just basic ingredients that you can often get very inexpensively at your local grocery store. In fact, the ingredients on that table (except for the yeast) is enough to make several loaves of bread.
Here’s the equipment you need…
One large mixing bowl A second one is useful, but optional - you can get by with one if you’re willing to wash it in the middle of the process.
One spoon You need a spoon to stir the dough.
One measuring cup A 1/4 or 1/2 cup measuring cup will do the job.
One measuring spoon A one-teaspoon measurer will be just perfect.
One bread pan Obviously, to bake the bread in.
One hand towel This is just to cover the bread dough as it rises so it doesn’t get drafts or dust or anything on it.
That’s all you need, and it’s all stuff that’s pretty common in most kitchens.
Now, for the food ingredients…
1/2 to 1 cup milk
5 teaspoons sugar (or 1 1/2 tablespoons)
1 teaspoons salt
5 teaspoons butter (or 1 1/2 tablespoons)
1 package active dry yeast (you can get yeast near the flour at your local grocery store)
2 1/2 to 3 1/2 cups flour (get unbleached white for your first attempt)
Corn starch or nonstick cooking spray (just to prevent the bread from sticking to the bowl or pan)
First, you should warm up your bowl - the best way to do that is to just fill it with hot water, then dump out the hot water, leaving the bowl rather warm. Then, mix up the yeast according to the directions on the packet. Usually, it will say something along the lines of “add a cup of warm water to the yeast and stir.” What you’ll end up with is some tan-colored water with some bubbles in it, as shown above. You should stir this until there are no lumps in the yeast.
Melt the butter in the microwave, then add it, the milk, the sugar, and the salt to the yeast liquid and stir it up until everything looks the same (a very light tan liquid). Then add two cups of flour to the mix - don’t add the rest yet.Start stirring, and then add the flour about 1/4 cup at a time every minute or so. It will stick to the spoon big time at first - don’t worry about it. Keep stirring and adding flour until the dough is still slightly sticky, but it doesn’t stick to your hands in any significant way. Also, it should largely clean the sides of the bowl, leaving just a thin layer of floury stuff.
Now comes the fun part: kneading. Take a bit of flour between your hands and then rub them together over the top of an area on the table where you’re going to knead the dough. Do this a few times until there’s an area on the table lightly covered in flour. Then grab the dough ball out of the bowl, slap it down on the table, and start kneeding it. Do this for ten minutes. Just take the dough, push it flat, then fold it back over itself, and repeat several times.
After about ten minutes, shape it into a ball, then either clean up the bowl you were using before or get out another bowl. Either coat the inside lightly with corn starch or nonstick cooking spray, depending on your preference, then put the ball of dough inside the bowl.
Put a cloth over the bowl and set it somewhere fairly warm for an hour. If you have a warming area on your stove top, that’s a great place to put it - set the warming area on as low as it will go. This is a good time to clean everything else and put the stuff away, but leave the flour out and the floured area on your table untouched.
After about an hour it should be roughly double the size that it was before, but don’t sweat it too much if it’s larger or smaller than that, as long as it rose at least some amount. Punch the dough down, then lay the dough out on the floured area and spread it out in a rectangle shape, with one side being roughly the length of the bread pan and the other side being about a bread pan and a half long. You may need to put a bit more flour on it and on the table to prevent sticking. Then, roll it up! The roll should be roughly the same size as the bread pan.
Tuck the ends of the roll underneath, with the “under” side being where the seam is. Then put the loaf inside of the pan.
Cover that loaf up with the towel, put it back where it was before, and wait another hour. This is a good time to clean everything up, then go do something else fun. The loaf should raise some more.
Put the loaf in the oven at 400 degrees Fahrenheit (200 degrees Celsius) for thirty minutes. When it’s done, pull it out and immediately remove it from the pan to cool.
H/T: The Simple Dollar


No comments:
Post a Comment